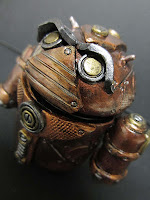
This year has just been filled with new discoveries. First it was the Munny vinyl dolls. Now I have discovered that the Google Mascot comes as a blank vinyl.
PLUS there is a whole underground of Google Droid collectors and customizers. I had to try it. And well...I'm hooked.
 |
| Copper Droid April 2013 |
The first was a custom order. I had a blank droid just sitting on the shelf waiting for me to come up with an idea. The buyer was a fan of my Steampunk Buddies and requested a similar style. There was the idea I had been waiting for!
I learned a few DOs and Do Nots in the process. Let's start with what you should NOT do. It is much shorter.
- Do NOT put the droid in the oven (if using polymer clay) for more than ten minutes. This will cause all sorts of warping and the pieces will likely never fit together again. I am still playing with the time, and ten minutes might still be too long.
Ha! Well that is the only big NO NO I have come across so far. How about what you SHOULD do?
- You definitely want to wash it with water and dish soap. This is so the chemicals from the making and packaging of the Droid are removed.
- Sanding helps too. It gives the clay and paint a bit of 'tooth' to cling to when you start customizing.
- If adding polymer clay make sure you are not making it too thick because it will take longer baking time to cure which could make your little guy melt in the oven. The thickest I have gone is 3/4 of an inch and that is only in selected spots like the chest piece. The other layers are about 1/16 of an inch thick.
- I bake the pieces separately and put them back together after the clay has cured.
- Now here is the tricky bit. After the oven I put the pieces in the freezer. I need them to cool down enough so that I can handle them, but still warm enough to be manipulated. Once they are cool enough so that I don't burn my fingers I put the arms in and put a brace under each. Why? Well if you don't they will cool into a very awkward angle that will later cause the arms to rub against the body. Paint rubs off and it gets a bit frustrating. I also put the head on as well. If you don't it may not fit all the way and it will end up having to be glued. (that happened with my first droid.)
These are the basics strategies I am currently working with. Another tip (recently discovered) is that if you have some cracks you can repair them with more polymer and stick the piece in a boiling pot of water. Since it is likely a small area not requiring a lot of clay you won't need to leave it in the pot for more than 7-10 minutes. You can also boil the arms to get them warm enough to position correctly if it did not go quite right the first time around.
I am still learning as I go, but I am enjoying every minute of it.
I will be making about 3 of these a month and will have them listed in my shop. I do take color requests. Requests can be made at my home page.
Until next time.
-Tanya
 |
| Plum Droid - May 2013 |
 |
| Sapphire Droid - May 2013 |
© Tanya Davis Art, 2013. All customized droid photos are the property of Tanya Davis Art.


No comments:
Post a Comment